Page 3 of 5
Posted: Wed May 13, 2009 3:01 pm
by Dan Faith
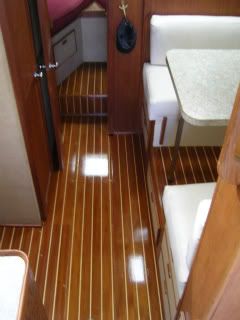
1/2 teak and holly plywood in my F32 total cost around $250.00. Also consider the strength add by screwing this down since it is structural in nature. Also alows access to bildge at anytime.
Posted: Wed May 13, 2009 7:18 pm
by fpawn1
Dan--saw the picture of flooring and it looks great--have been thinking of doing the same in my 1981 f-32-- would you please explain more about the product---my kids say I am a slow learner---also about installation--in the picture could not see how the floor lifts up to get under the floor. Did you have to replace your orginal sub flooring? Was it nailed to the sub? Any and all info would be greatly appreciated.
Frank D.
Posted: Wed May 13, 2009 11:42 pm
by Eddie-O
Gofish103 could not find the box it came in will look to see if there is a name on the material. I Tested the material by placeing it in a bucket of water for 2Hrs when it dryed it did not swell up. Mrslugo had it on the floor of his old Pace Maker for 2 or 3 years and it still looked good. That why I tried it on my F32 and am very happy with finished job.
Posted: Thu May 14, 2009 12:02 am
by kevin babineau
wow dan that looks awesome...how u get it so shiney?
Posted: Thu May 14, 2009 6:30 am
by foofer b
Previous owner put pergo in my cabin. Had to get to the bilge pump in a bit of a hurry and had a hell of a time getting the stuff up. Had to break most of it apart to remove it, after unscrewing all the cabinetry and floor molding. Then I found that the plywood of the cabin sole also held the batteries. Had to remove them too just to get to the bilge pump. Rebuilt the floor with marine plywood, with separate pieces for the batteries and a small piece over the bilge pump that I did not screw down. It's under the steps so doesn't get much traffic. Then I got a nice piece of berber carpet an cut it to fit the sole. Lifts out easily without removing trim or the cabinets under the dinette. Is cheaply replaced if soiled and offers 10 second access to the bilge. Plus it is much lighter than wood laminate. Only way to go.
Posted: Thu May 14, 2009 9:50 am
by Dan Faith
I will take addional pictures this weekend. I have two small hatches with ring pulls to get into the forward bilge pump and one by the stairs to get into the hollow keel (I keep it pumped out and dry so no smell). There is also a screwed down small hatch to get to the shower box. the whole floor is screwed down and replaces the old sub floor. I have 5 coats of flecto valspar polyeurothane (same as my hard wood floors at home) they have held up for 15 years.
Posted: Thu May 14, 2009 9:54 am
by jwrape
Dan Faith wrote:I will take addional pictures this weekend. I have two small hatches with ring pulls to get into the forward bilge pump and one by the stairs to get into the hollow keel (I keep it pumped out and dry so no smell). There is also a screwed down small hatch to get to the shower box. the whole floor is screwed down and replaces the old sub floor. I have 5 coats of flecto valspar polyeurothane (same as my hard wood floors at home) they have held up for 15 years.
Yea, i really want to see more photos and maybe some close ups. I am about to replace my carpet with some sort of flooring and want to see yours
Posted: Thu May 14, 2009 10:27 am
by ready123
jwrape wrote:Yea, i really want to see more photos and maybe some close ups. I am about to replace my carpet with some sort of flooring and want to see yours
Are these not big enough, if you click on them they will get larger:
I hope Dan doesn't mind the link to his library....
http://s251.photobucket.com/albums/gg303/DANFAITH/
Posted: Thu May 14, 2009 10:29 am
by jwrape
ready123 wrote:jwrape wrote:Yea, i really want to see more photos and maybe some close ups. I am about to replace my carpet with some sort of flooring and want to see yours
Are these not big enough, if you click on them they will get larger:
I hope Dan doesn't mind the link to his library....
http://s251.photobucket.com/albums/gg303/DANFAITH/
Oh, those are good. Very Nice
Posted: Thu May 14, 2009 11:22 am
by Dan Faith
I don't mind I will get some better close-ups on the flooring. It really wasn't much of a job, finishing was the longest since I can only get to the boat on weekends and have to wait between coats. Put a coat on Sunday before I leave each week.
Posted: Thu May 14, 2009 6:24 pm
by foofer b

Beautiful floors, Dan. I think you mighta changed my mind!
Posted: Thu May 14, 2009 8:42 pm
by ready123
Dan Faith wrote:I don't mind I will get some better close-ups on the flooring. It really wasn't much of a job, finishing was the longest since I can only get to the boat on weekends and have to wait between coats. Put a coat on Sunday before I leave each week.
Very nice look.... I have always thought about doing that, having seen your photos, now I will be doing that!

Do you think there would be disadvantages to finish the sections before laying them finally.... once sized, fitted, drilled etc:
What sections did you leave with easy lift handles? Just the bilge access in the V berth? I don't see having to unscrew the piece for shower drain access as a problem.
Do you have it in the salon also? If so did you go 1/4" and put on top of existing subfloor or did you remove old floor and replace with 1/2". My existing floor is in good condition so I was considering going with 1/4" T & H on top of existing....screw &/or glue.
Posted: Thu May 14, 2009 9:46 pm
by gofish103
Wow that really looks nice
Posted: Fri May 15, 2009 8:45 am
by Dan Faith
Ready123,
Finish might be easier before installation, I would drill and dry fit first though. My lift rings on inspection covers are in the V berth, and just in front of the stairs. The shower drain access is too small to just lay in place and would give me trouble keeping it down so just a few small screws did the job my panel is about 6" x8". I have carpet in the salon only because it helps deaden the engine noise when underway and is easy to move my sleeper/couch on. I removed my old sub floor the previous owner had installed a pergo type floor and nailed it to the sub. This trapped moisture and it was in pretty bad shape. The 1/4" over the existing floor would work great I would glue and screw it in place this would eliminate any voids between the new and old and moisture being trapped as in mine. When redoing my stringers I exposed a hole in the hollow keel that is were I put my access with pull ring and I can keep the hollow keel dry. (closer pictures to follow)
Posted: Sun May 17, 2009 7:55 am
by Dan Faith
gofish103 Ispoke to Bob Saturday and I understand you are on Marblehead. If you like I'm on Catawaba just a couple miles away you would be welcome to come over to see how I did my floor.
Dan