Page 1 of 1
Calling wood repair guys....
Posted: Sat May 07, 2011 2:32 pm
by jddens
OK, now that the new engine is in I need to tackle some cosmetic issues...I'm not very experienced with wood repair on boats so I'm seeking advice.....
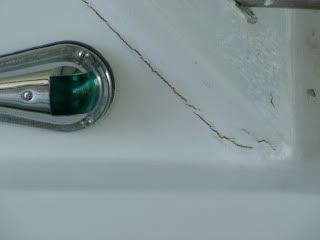
In the first pic you see a seam opening up some....I want to fix this, I'm thinking open it up a little with the dremel and fill with marine tex, sand and paint....does this sound logical???
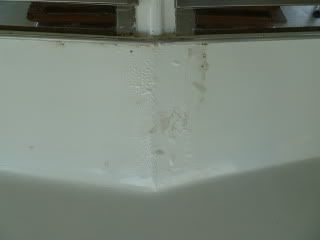
The second pic shows some bubbling and discoloration......can I just sand this down to the glass and paint???
Thanks in advance!!....John
Posted: Sat May 07, 2011 5:42 pm
by Peter
Aaron: anywhere that sells west epoxy will also west's repair manual on how to properly use epoxy.it's about 5 bucks and will explain how to put together filler, as well a faring compound.and of course it covers basic fiberglass repairs. ( it's a really good investment and good bedtime reading for us do-it-yourselfers)
I would not trust the marinetex.personally I would put together some epoxy,and microballons to a consistancy of mayonase,and work it into the crack,would open it a bit to get good adhesion.after it dries, sand and paint and done.for the other spot would sand,clean, mix epoxy with microballons to peanut butter consistancy, and use as a fairing compound, then sand and paint.
really is simple stuff to work with and you can fix almost anything with it.

Posted: Sat May 07, 2011 11:20 pm
by Big D
John, before you fill anything in, chances are the reason why it got that way is the fasteners are loosening off. Simply filling will not FIX the underlying problem. When you fill, you'll need to paint anyway so take the time to scrape away the whole corner to bare wood including the front, exposing the plugs that will be covering the screws. Remove the wooden plugs and the screws. Crean out the seam you're going to repair, wet out the mating surfaces, and screw back together with bronze or SS WOOD screws. Plug the holes again with mahogany plugs wetted with varnish not epoxy.
The epoxy repair Peter suggested is fairly common if that's the route you want to take. Yes get the "Wooden Boat Restoration & Repair" manual from West System. Packed full of info. I think thier part number is 002-970. Also check out
http://www.epoxyworks.com/. Lots of good advice and projects there too. The only thing that I would add to Peter's post is to wet out the area first that you're puttying and let cure for a bit before filling with the putty.
Posted: Sun May 08, 2011 1:44 am
by jddens
Thanks for the responses....now I will show my ignorance on this topic.....when you say "wet out" what do you mean????
Posted: Sun May 08, 2011 10:40 pm
by Big D
"Wet out" is just epoxy and hardener without any thickeners. This will penetrate the wood grain deeper than simply putting filler on it's own. The filler won't have a problem bonding to the epoxy/hardner mix, and the wet mix will make a better mechanical bond to the wood due to penetration. Wetting out the plugs with varnish is just that, wet the plug with varnish only before plugging the hole. The reason for varnish and not epoxy is you'll have a hell of a time removing all the plug pieces if you ever have to get to the screws again. You can wet the screw threads with epoxy before installing them. This will also provide a better mechanical bond and prevent the screws from pulling out over time.
Posted: Mon May 09, 2011 10:11 am
by jddens
OK, thanks guys. I'll head to west marine and get the book and I know they sell west system stuff........thanks for the advice, I will take it............John
Posted: Tue May 10, 2011 6:57 pm
by Big D
John, I should warn you that this type of bond is permanent and if you ever have to open that up again for any reason; to replace the side piece for example, you will be hard pressed to separate the corner without doing damage. Having said that, if you ever have to go there, anything can be repaired again. If used right, epoxy can be a wooden boat's best friend.
Posted: Wed May 11, 2011 9:31 am
by jddens
Thanks Big D.........I started the repair yesterday. Lots of scraping and sanding, hope to wet it out and fill it today......then more sanding and some painting. Glad this first repair is small, seems like a good place to start gaining some experience in this type of repair.....I know there will be more in my future...........John