Page 1 of 1
Fixing Detached Fiberglass
Posted: Sun Oct 05, 2014 8:06 am
by RobertS
Water got behind the fiberglass over the last winter and created a water 'blister'.
Here's a picture of how I dealt with it in the simplest way.
I cut down the center of the fiberglass and across the top (abt 9" down), behind where the stainless trim screws on.
Then I had two flaps which I opened up for a few weeks of drying.
Once it was dry, I scraped the loose materials out with a long drywall type saw.
I pored epoxy into each 'flap' and squeezed it upward.
My battery is low now so I'll have to cut it short.
Th boat is coming along quite well after this, my second summer on it.
I have a number of pictures if anyone wants to go over this.
Re: Fixing Detached Fiberglass
Posted: Sun Oct 05, 2014 10:19 am
by prowlersfish
Do you have a picture of the blister ? I assume it was on the deck ? As the decks were fiber glass over wood and the hull sides are wood ( plank over plywood ) unless someone had glassed the hull ? What looks to be planks on the side seem to be very flexible , is the wood bad ?
More pics would be great , and help under stand the problem and construction and repair .
Thanks for sheering
Re: Fixing Detached Fiberglass
Posted: Mon Oct 13, 2014 11:05 pm
by RobertS
prowlersfish wrote:Do you have a picture of the blister ? I assume it was on the deck ? As the decks were fiber glass over wood and the hull sides are wood ( plank over plywood ) unless someone had glassed the hull ? What looks to be planks on the side seem to be very flexible , is the wood bad ?
More pics would be great , and help under stand the problem and construction and repair .
Thanks for sheering
Glad for your comments.
I have lots of pictures, just might take a few more days to get them posted.
The blister formed between the fiberglass skin and the plywood on the outer hull, which is 1" plywood with fiberglass over it all. The water got in from above, through the rotted toe rail. It must have had about a liter of water in there.
The decks are teak, no fiberglass involved there.
The black strip is only the peeled back fiberglass, I replaced the top 9" of the plywood, about 6 ft of it. I wirebrushed the rest of the wood to remove the loose fibers. Pictures soon...
Re: Fixing Detached Fiberglass
Posted: Tue Oct 14, 2014 12:09 am
by RobertS
Just found a few pictures, this one reveals a few more things. I let everything dry out for a few weeks the tore away all the loose wood with the wire wheel. I used two pieces of 1/2" plywood for the top area that was too saturated, with the fiberglass mesh in between, staggered all the joints of course. One boat expert at the marina said this repair would normally be done by cutting out the entire area and rebuilding it all.
Re: Fixing Detached Fiberglass
Posted: Tue Oct 14, 2014 6:38 am
by todd brinkerhoff
It probably was inconsistent bonding between your substrate (plywood) and the fiberglass and resin, which allowed moisture to get in and spread. Its tough to get a 100% bond without vacuum bagging. Preparation of substrate is equally important. Pictures are great.
Re: Fixing Detached Fiberglass
Posted: Tue Oct 14, 2014 6:46 am
by prowlersfish
FWIW epoxy will do a better job bonding to the wood then reg polyester resin
Re: Fixing Detached Fiberglass
Posted: Tue Oct 14, 2014 8:12 am
by RobertS
Well it is a 1969...I would say that water got in and froze then expanded over and over through the winter.
todd brinkerhoff wrote:It probably was inconsistent bonding between your substrate (plywood) and the fiberglass and resin, which allowed moisture to get in and spread. Its tough to get a 100% bond without vacuum bagging. Preparation of substrate is equally important. Pictures are great.
Re: Fixing Detached Fiberglass
Posted: Tue Oct 14, 2014 9:42 am
by todd brinkerhoff
RobertS wrote:Well it is a 1969...I would say that water got in and froze then expanded over and over through the winter.
todd brinkerhoff wrote:It probably was inconsistent bonding between your substrate (plywood) and the fiberglass and resin, which allowed moisture to get in and spread. Its tough to get a 100% bond without vacuum bagging. Preparation of substrate is equally important. Pictures are great.
Age and water intrusion are obviously a major part of the issue. But as I am looking at the pictures, it appears as there was a poor bond between the wood and the laminate. Even with the wood rotting, the adhesion between the laminate and wood should stay mostly intact. From the pictures, the laminate was peeled away from the wood. In a proper laminate/substrate bonding job, the wood may rot, but the laminant won't simply peel away without major chisseling. As Prowlerfish stated, Epoxy is superior to poly resin for adhesion. Also, treating the wood with Clear Penetrating Epoxy will aid in stabilizing the wood substrate. You MUST ensure that the CPES is completely gassed off prior to any other epoxies being applied, or you will have an unsuccessful bond. The CPES would be for stabilizing the substrate only, and not for bonding purposes. Obviously, wood will continue to absorb water, which will cause expansion and contraction. This is the opposite of what the laminate does. The only way to ensure stabilization of the wood is to treat it so it does not absorb water.
As I said, especially with a vertical surface, Bonding will be you most challenging part. If you can find a big enough vacuum bagging system, this may help.
Re: Fixing Detached Fiberglass
Posted: Wed Oct 15, 2014 8:35 am
by RobertS
prowlersfish wrote:FWIW epoxy will do a better job bonding to the wood then reg polyester resin
I used marine epoxy and 3M bubbles to fill, and adhere the skin, after cleaning away all the loose fibers. I stuck a few strips of fiberglass behind the vertical cut at the same time.
On the top, where there was more damage, I coated it all with epoxy only before rebuilding it all.
Re: Fixing Detached Fiberglass
Posted: Wed Oct 15, 2014 9:03 am
by todd brinkerhoff
RobertS wrote:prowlersfish wrote:FWIW epoxy will do a better job bonding to the wood then reg polyester resin
I used marine epoxy and 3M bubbles to fill, and adhere the skin, after cleaning away all the loose fibers and I indented the cut area for the new buildup. I stuck a few strips of fiberglass behind the vertical cut at the same time.
On the top, where there was more damage, I coated it all with epoxy only before rebuilding it all.
How are you creating pressure on your laminate during the drying process?
Re: Fixing Detached Fiberglass
Posted: Wed Oct 15, 2014 7:43 pm
by RobertS
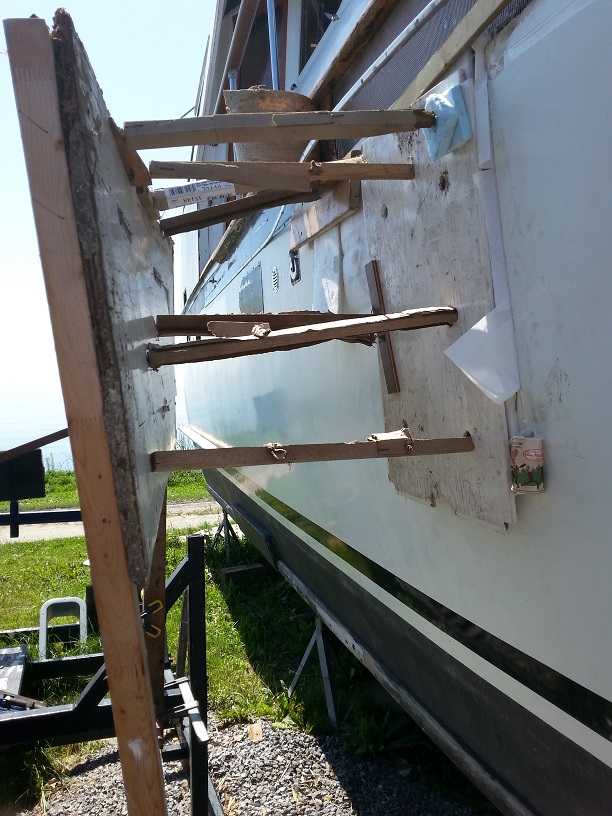
- support.jpg (196.71 KiB) Viewed 6950 times
todd brinkerhoff wrote:RobertS wrote:prowlersfish wrote:FWIW epoxy will do a better job bonding to the wood then reg polyester resin
I used marine epoxy and 3M bubbles to fill, and adhere the skin, after cleaning away all the loose fibers. I stuck a few strips of fiberglass behind the vertical cut at the same time.
On the top, where there was more damage, I coated it all with epoxy only before rebuilding it all.
How are you creating pressure on your laminate during the drying process?
There were some steel pontoons and a rack beside the boat and I anchored some vertical planks to those. Then a sheet of plywood to provide the backing for my 'pressure rods'
To try to even the pressure across the half of the repair I was doing, I used corrogated cardboard then 1/2" polyfoam and 3/8 plywood, which curved once it got some pressure at the strategic points.
This picture is the left half of the repair (right is already done). The paper cup was to catch the epoxy that was squeezed out.
Re: Fixing Detached Fiberglass
Posted: Thu Oct 16, 2014 9:43 am
by todd brinkerhoff
There were some steel pontoons and a rack beside the boat and I anchored some vertical planks to those. Then a sheet of plywood to provide the backing for my 'pressure rods'
To try to even the pressure across the half of the repair I was doing, I used corrogated cardboard then 1/2" polyfoam and 3/8 plywood, which curved once it got some pressure at the strategic points.
This picture is the left half of the repair (right is already done). The paper cup was to catch the epoxy that was squeezed out.
Very innovative. Nice job!!