Page 1 of 1
F32 scale model making
Posted: Mon Dec 05, 2011 10:14 pm
by summer storm
Hello everyone,
I thought I would start a new thread instead of hijacking DAVIDLOFLAND's
As I stated before I have always thought of building a model of the 32, now that I see the there are other members wanting the same thing it may just lower the cost to a point that makes it cost affective. I contacted the NA that I work with and this is what he sent me, with this filled out he can make a scale drawing of a f-32 hull. Once I have the drawings I can get a price for the plug and molds, only then will I be able to price this project out. I may turn out to be to much but at least I'll take it that far. I know that some members offered to help with the measuring but I am a little hesitant to ask as this project may get shut down after the drawing are done. My boat is in the water but I should be able to find a 32 in the area, I think? I know where a junked 32 is but the yard dog does not look like the cute little dog that sleeps on my couch so I think I'll pass on that one. Anyone have a 32 out of the water within 50 miles of Lauderdale?
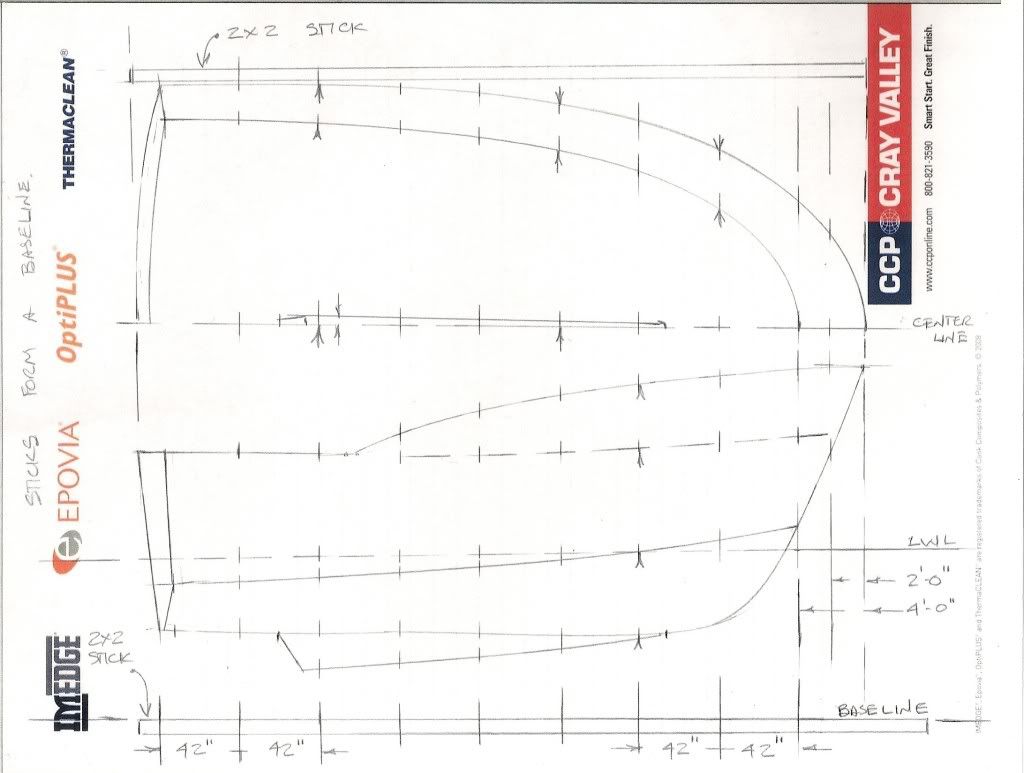
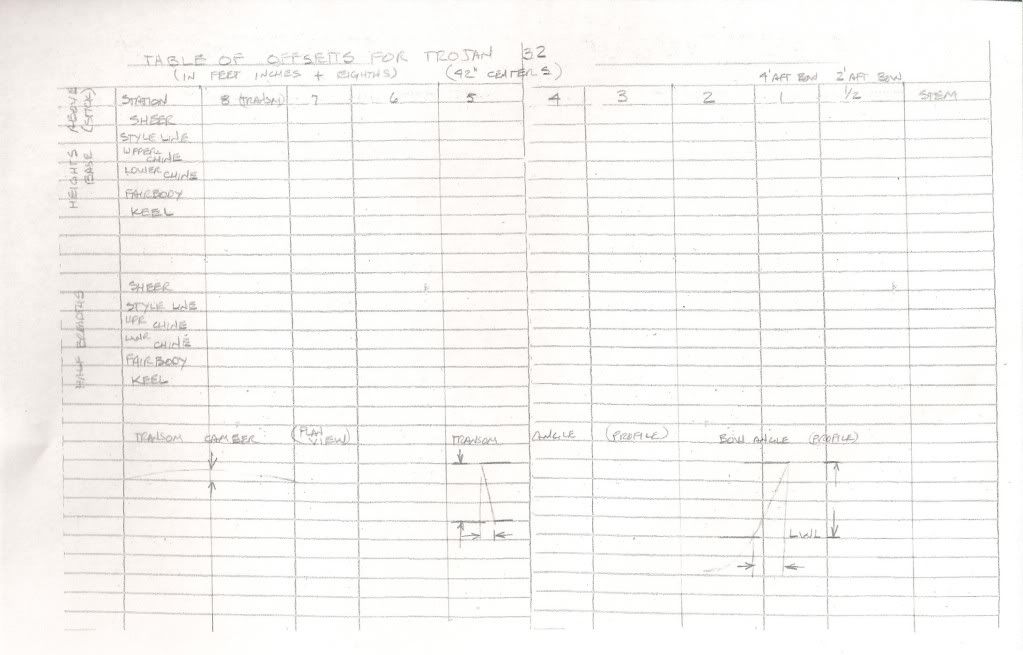
Below is what the NA sent me and I have no idea what it means
 Doug
Doug
here's the forms, including an example from the old hargrave office
the measurements can be 3' - 8 1/8" as opposed to feet-inches-eights -
i don't now if your 32 has a second spray type chine or just a single -
you'll have to put down a couple of sticks on the ground to form baselines -
you may have to level the ground a bit to for a "base" to measure from
call if you have questions
greg
Posted: Wed Dec 28, 2011 11:41 am
by summer storm
Well,
it seems that there isn't a 32 out of the water anywhere in south Florida

I don't want to give up on this so if anyone hears of one please let me know
thanks
Posted: Tue Jan 03, 2012 11:28 am
by BMILLER
What scale are you trying to model, 1/4, 1/8. etc? Next, try to get someTrojan line drawings from advertisements, etc. OEMs normally provide good accurate literature. Find an interior cutaway down view, this locates your interior. Get a good camera an find any suitable boat, it water or out........take photos from every angle, and many of them down to the details. Take measurements at various locations to establish a ratio for reference dimensions.
You then need to start the composite model by making patterns of the hull, the deck, the flybridge and the aft deck. All separate. Depending on your scale, the patterns should be at maybe 1ft horizontal increments, yes you will have a LOT of patterns. I make them out of timecards, firm and easy to obtain. You will then start to model the hull, inverted. If its to be mass produced, use modeling clay, if a one off, wood. Your modeling medium must be larger then the finished product and be squared in all dimensions. Accurately, bisect all surfaces LIGHTLY with a height gauge.
Now you can start to create your master. One rule that must never be broken, if making a model concentric, NEVER remove material that takes away that scribed center line.
Start with the inverted hull. If you made proper patterns, you can lay them, one at a time along the hull and lightly scribe the hull shape. You can them start to remove material to establish the shape, but don't go exactly to the scribed line, leave some meterial for tweating the final product. After you have that done, do the same for the hull via a top down view. Nexr, with your hull patterns for every one ft (?) horizontal dimension, start removing material. Start with the deepest section and work up. This means you may start in the middle of the hull and move fwd/aft. This a time consuming process but it works well. If this is too difficult, add chines and keel on as separate pieces, they can be blended in and become invisible later.
Decks, flybridge, etc all follow the same procedure. ALL based off line dwg and accurate photos and the scale dimension established earlier. IF you have access to an industrial copy machine like those used in architecural work, its easier to get proper dwgs.
If using modeling clay for the master, build a box around it about 3in bigger than the master width and 2in higher than highest point along the keel line. Into this box is where you will pour silicon to make a female mold. You could also use urethane. Look to taxidermy shops for materials or Dick Blick art supply. You need to then mix your mold material carefully, not to introduce any air into the mixture and carefully pour it into your box containing your hull master. Let it cure. After it has, remove the box sides and lift your master female mold from your male master model. Do the same for the deck, flybridge and every other part. It takes some time to do, but it works. If you have access to a 3D pantagraph, the process is MUCH easier and quicker. All in all its a big project and takes thought and patience.
I'm formerly a master modelmaker who has produced the masters for the Danbury Mint, Lennox china, David Winter Cottages, etc.
Again, the key is to take many good photos, establish a desired scale, start with a squared and layed out block to start and be patient.
BTW, if you make your male master from wood, you can vacuum form the model too. Good luck.
Posted: Tue Jan 03, 2012 11:37 am
by rossjo
Here is a good outline from 1970's era F32 ad:

Posted: Tue Jan 03, 2012 9:01 pm
by summer storm
BMILLER, thanks so much for the info. I was thinking 1" = 1' which of course would make the model 32" I think it will be a lot of work but it might be worth it.
BTW sounds like you had a pretty cool job and I think I might have some of your work
on the shelf.
Posted: Wed Jan 04, 2012 8:43 pm
by BMILLER
Yes, I sure enjoyed it. But "hand built and tooled" prototypes are a thing of the past. Now everything for the most part is sterolithography. Old school craftsmanship and gone almost extinct. Except for the duck carvers.
Here's a couple of simple things that are a must. 1st have very accurate 3d blocks to start with. 2nd determine what your first cut AND last cut will be, after the last cut you won't be able to position your piece in any device to hold it to rework. 3rd think thru a plan how to make it BEFORE you start to make your model. And 4th and most important, always perform step one completely before you go on to step 2. Skipping steps in the procedure you plan will come back a bite you, usually after hours of work and now you must start over. Learned that one in the School of Hard Knocks years ago. Be patient.
If it were me, I'd use basswood and make a 1 off model. Virtually no grain, easy to repair mistakes, sands very smooth, holds finish very well and readily available online or at carving shows. You can even cast your own metal parts using silicon molds too. Possibilities are only limited by your imagination and desire to learn.