Part No. 55-572
Page 1 of 2
Note: All required fastenings for re-assembly are packaged in one (1) carton marked re-assembly
fastenings and placed on board. Refer to attached sketch for fastenings and locations.
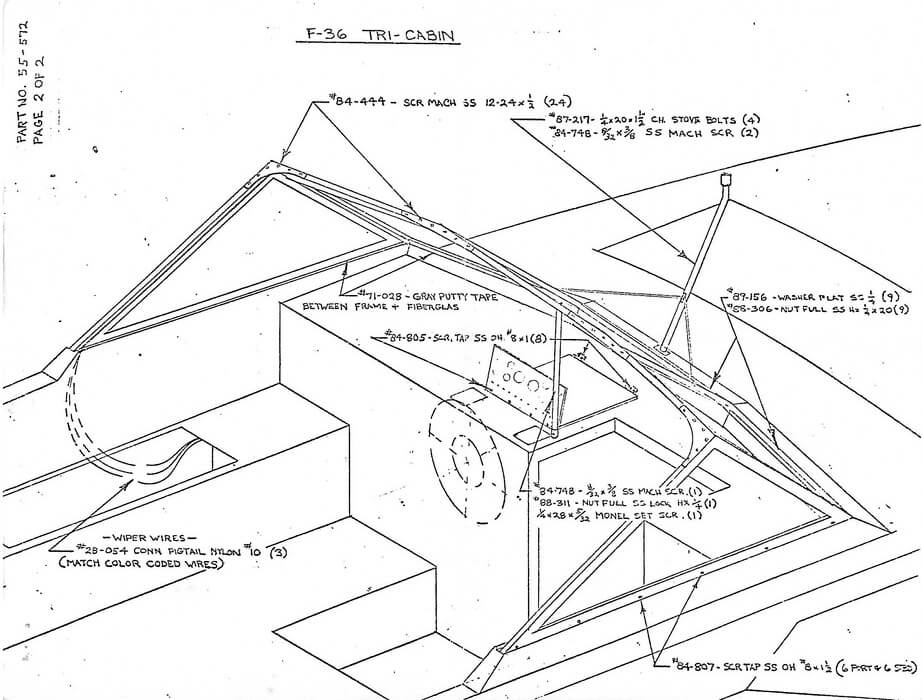
1. Position forward and side windshield frames and fasten using:
30ft. – Part No. 71-028 ----- Gray Putty Tape
9 –---- Part No. 88-306 ----- Nut Full ----- SS Hx 1/4" x 20
9 –---- Part No. 89-156 ----- Washer Flat SS 1/4"
12 –--- Part No. 84-807 ----- Screw Tap SS 0.H. #8 x 1-1/2"
24 –--- Part No. 84-444 ----- Screw Mach. S.S. 12-24 x 1/2"
1 –---- Part No. 84-748 ----- 8/32 x 3/8 SS Mach. Screw
1 –---- Part No. 88-311 ----- Nut Full SS Lock Hx 1/4"
1 –---- Part No. (None) ----- 1/4 x 28 x 5/32 Monel Set Screw
2. Position the anchor/running light to the pre-drilled holes in the windshield cowl and fasten using gray putty tape and:
4 –---- Part No. 87-217 ----- 1/4 x 20 x 1-1/2" Chrome Stove Bolts
Fasten the mast stays to the pre-drilled and tapped holes in the windshield frame using:
2 –---- Part No. 84-748 ----- 8/32 x 3/8 SS Mach. Screw
Connect the mast light plug to the plug in the "windshield bolt access area" in the salon headliner.
3. Position instrument panel and hood and fasten using:
8 –---- Part No. 84-805 ----- Screw Tap SS 0.H.. #8 x 1"
4. Route windshield wiper wires through the channel in the windshield and the port side window frame. Connect matching color coded wires under port sundeck seat using:
3 –---- Part No. 28-054 ----- Connector Pigtail Nylon #10
5. Install windshield bolt access cover in the salon headliner using:
14 –---- Part No. 83-153 ----- Screw Wood CH OH 118 x 1
14 –---- Part No. 89-353 ----- Chrome Finish Washers